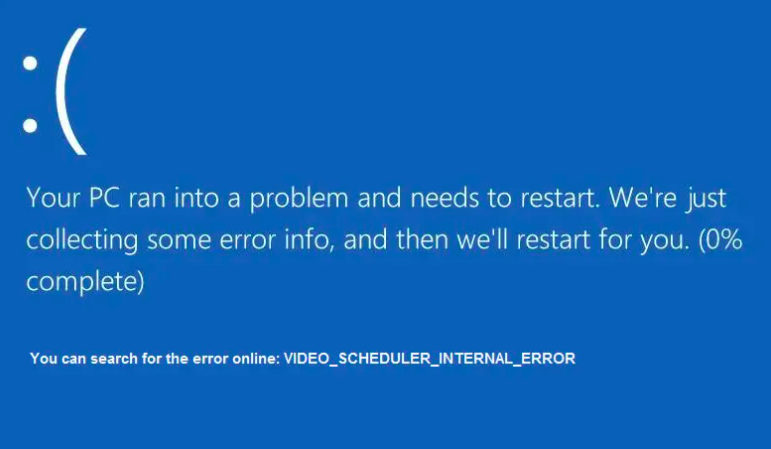
While watching any video or browsing something, the computer might go blue which is a bit irritating for the user. Along with this, the user faces some errors too. There are many types of ‘Blue Screen of Death’ that disturb the functionality of the computer. The ‘Video scheduler internal error’ is one such problem that occurs while browsing or using some software on the computer.
The error of the video scheduler internally is a general puzzling stop code error in Windows 10 that points out serious damage detection by the video scheduler. It might occur due to software or hardware alterations, infection due to virus or malware, software of incompatible protection, ruined windows registry, overclocked graphics card, or non-operational drivers and graphics card present in an operating system. The ‘Video scheduler internal error’ freezes the computer for some time and restarts with a sound which is very irritating at times.
Moving on; we’ll discuss some prominent methods which could be incorporated to avoid this error.

Method 1: Go for BSoD third-party fixer
To solve the issue of BSoD error, go for a BSoD third-party fixer or any other device related to it. It will repair the destroyed files of the system and will also eliminate harmful data alongside securing the system from malicious malware.

Method 2: Scan the complete system
Step 1: Select the option of ‘Virus & threat protection.
Step 2: A new window appears. Choose the option of ‘Advance Scan’.
Step 3: Search for the option of ‘Full scan’. It will scan the complete system.
Step 4: Use the Windows’ in-built antivirus, the Windows Defender.
As mentioned above, the reason for the ‘Video scheduler internal error’ is malicious code. The bugs created by them result in many issues that are linked to ‘Video scheduler internal error’.
Method 3: Registry repair
Step 1: Choose option ‘Start’, write ‘cmd’.
Step 2: Proceed further by right-clicking on the window which gets displayed up on the screen.

Step 3: After the process of scanning gets completed, restart the computer. This will repair all the damaged files.
In case if the other options don’t show up reliable results then users can opt for this alternative method which is mentioned below.
Alternative Method: Use Microsoft system file checker or CCleaner for checking the damaged files alongside performing verification of the file integrity and repairing the files that have some issues.
Also Read: Fix The Error Message “This Device Is Not Configured Correctly (Code 1)”
Method 4: Video drivers updating
Step 1: Press ‘R + Windows key’. It will start the Run program.
Step 2: Write ‘devmgmt.msc’ in the appeared Windows.
Step 3: Select ‘OK’. The Device Manager opens.
Step 4: On the left side of the device manager panel, select ‘Display adapter’. Expand this particular window and choose ‘Video card’ by right-clicking on it.

Step 5: Tap on the option ‘Update Driver.
Step 6: For initiating the updating process, start following the prompts displayed on the screen.
Step 7: After the completion of the Driver update, restart the computer.
In case, if the above steps don’t work out then prefer implementing the alternative options which are mentioned below for reliable results.
Alternative Method 1: Update the Graphics driver as well, if its version is old to solve the ‘Video scheduler internal error’.
Alternative Method 2: To update the driver automatically, use software that has a specialty in maintaining the functionality of the updated drivers.
Method 5: Video card drivers’ reinstallation
Step 1: Press ‘R + Windows key’. It will start the Run program.
Step 2: Write ‘devmgmt.msc’ in the appeared Windows.

Step 3: Select ‘OK’. The Device Manager will open up on the screen.
Step 4: On the left side of the device manager panel, select ‘Display adapter’. Expand the above option and choose ‘Video card’ by right-clicking on it.
Step 5: Choose the option of ‘Uninstall Driver’. Restart the computer.
Step 6: From the Windows Download Center, download and install the latest video card driver.
Or
Step 1: Uninstall the current version of the Video driver.
Step 2: Download and install its latest version from Windows.
Also Read: Simple Ways To Find Windows Product Key
Method 6: Uninstallation of the installed latest software or hardware
Step 1: In the windows search bar, search for ‘Apps & programs’. Press ‘Enter’.
Step 2: A list of programs windows appears. Select the ‘Installed’ option present on the drop-down list.
Step 3: Choose the recently installed program on the computer.
Step 4: Choose the option of ‘Uninstall’.
Step 5: Start following the prompt for a complete uninstallation of the application.
Step 6: For the hardware uninstallation, from the computer detach the recently installed hardware.
Step 7: Restart the system to solve the ‘Video scheduler internal error’.
Method 7: Updating of the Windows operating system
Step 1: In the Windows search bar, search for Windows update and press ‘Enter’.
Step 2: Check the updates and go for the installation of the available version.
Step 3: Restart the computer after it gets updated.

Conclusion
There are many solutions for fixing up the ‘Video scheduler internal error’ out of which we have explained some of the most popular methods in this article. Our methods will help you to watch any video or browse on the system without facing the blue screen issue. The guarantee of fixing out this error is 100 % reliable if you try any of the methods which are mentioned above by us.


